The Big Fix!
It’s funny (in a no laughing matter sort of way) what goes through your mind when facing a situation that could be a $2500 dollar repair expenditure.
Well, after making an appointment for the end of July! for a possible “fresh water tank replacement” (see blog post “Water Tank Failure”) at my local RV repair place. Thinking about it, I decided to contact Nick at Airstream of Spokane (the dealer we purchased Blue Streak from). I did this because I knew he would make logical suggestions (which he did). Nick suggested before we think about the expense of a tank replacement to cut an access hole in the pan and make sure the connection between the tank and drain valve had not failed.
Here is what this looks like:
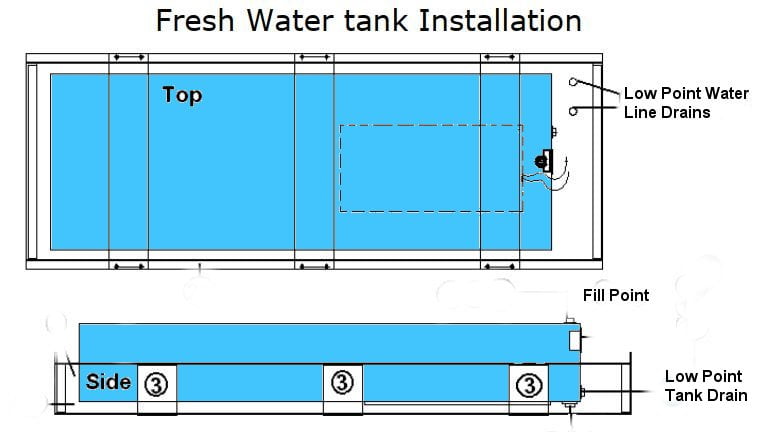
The tank itself lives inside a pan fixed between the axels (see above). Note the location of the “low point tank drain” in the side view. What I want you to really notice is the GAP between the end of the tank and the pan. Now check out the perspective below to have an indication of what this looks like from outside.
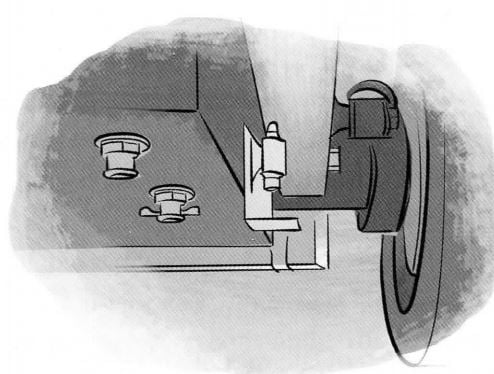
In this pretty picture you can see the drain valve and the protective plate behind the passengers side front wheel … (FYI the two items to the left are the low point drains for the water lines which also run through the GAP between the water tank and the pan indicated in both illustrations above).
So I simply cutout an access in the face of the pan next to the drain valve – and this is what I discovered in the GAP (see below).
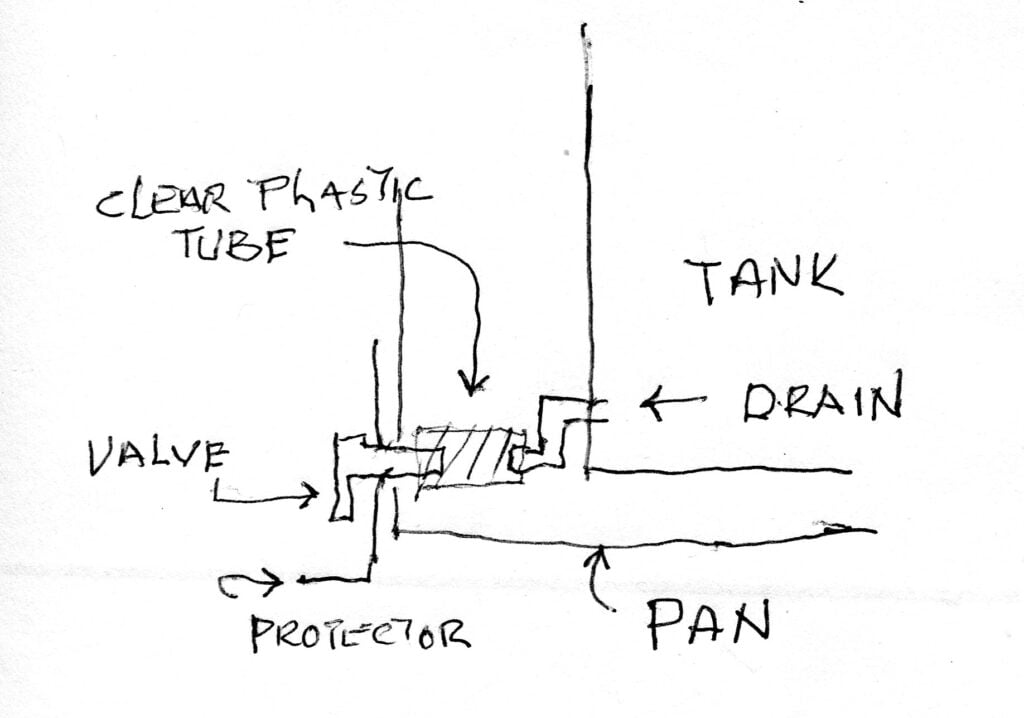
What we see is a clear plastic tube about 3/4″ long, hose clamped to the brass tank fitting and the nylon valve. Of course this had to have been done before the the tank was installed at the factory and I would guess before the floor laid over top. In other words, a forever installation, inaccessible, with no concept of ever failing or needing repair.
Two things to note!
- That the tank when filled with water weights about 450lb and all the stress is on that small bit of 3/4″ long clear plastic tube which needs to flex as the connections it is hose-clamped to are not going to flex.
- That small bit of plastic tube is now 20 years old and has gone from soft and flexible to brittle and cracked.
So guess what? the forever, inaccessible clear plastic tube joint failed. ?
OK – OK, I have now fixed the problem by the grace of God. I relocated and replaced the external drain valve and replaced the failed 3/4″ long bit of clear plastic tube with 6″ of reinforced thick wall plastic tubing that will allow for flex and I hope will never fail in this life time. Also everything now is accessible should future repair be required. Total cost = $15 DIY dollars and 3 hours time. ?
The last thing to do is fill the tank with cool clear H2O and Blessed be the Name – perfect.
We can now salvage what’s left of the Summer and go Boondocking……….

About The Author
Brickster
Brick and Mona are avid Boondockers, love "Glamping" but still like to experience the down and dirty off grid camping - look for us and say hi. We are easy to spot just look for 25 feet of shiny Air-Aluminium towed by a Dragon Red F-150HD FX4.
Comment
Hi Brick,
Denny Mooradian here in Atlanta. 770 8156487. Please feel free to call me.
I took my 2019 international serenity to the airstream dealer/shop here in Atlanta and they discovered a hairline crack in the 3 inch plastic pipe that goes between the fresh tank and the belly pan to the drain valve. They replaced the 3 inch pipe but now almost a year later, I have a small drip coming from the same area near the valve. I could take the airstream back to the dealer but they want to keep it for three weeks and possibly longer depending on the parts. Your fix sounds simple enough. What did you use to cut the aluminum belly pan, did you remove the front tire and how did you jack up the trailer? Jack or roll onto ramps?
Administrator Reply:
Hi Denny,
First of all the water tank on the International 25 is located between the two axles. The whole thing hangs below the aluminium belly pan.
When we first notice the “leak” I had filled the tank (because of the weight it is normal for the tank to sag and bulge so gravity will cause the water to flow to the lowest point which makes it look like the tank leaks).
I use a hole saw to open the pan (which the tank lives in) since the valve was 16-17 years old the plastic was brittle and I just broke it off before I enlarge to hole to get at the short bit of plastic tube as I explain in the “Big Fix Post”
The neo-plastic pan that holds the tank is not very thick so easy cut – I didn’t have to remove the tire nor jack-up the AS. However, Removing the tire would make it completely accessible which means using a tire ramp to raise it off the ground. I guess it’s a matter of choice ?
Hi,
Thanks for the informative info on H2O tank drain. Please post a photo of where you cut the access hole to get into the area to replace the flex hose?
Did you also replace the troublesome plastic tank drain valve, & how was it mounted????
Thanks for any additional help on this issue.
Administrator Reply:
Hi Don,
The location is (was) directly behind the old “plastic” drain valve. I had tapped a hole beside it to discover the leak. Since the old valve was 20 year old it was ready to be replaced. Once removed all was visible and the repair went just as described. I did replace the old valve with a new one simply because it was trashed.
Brickster
It is a bit more clear now, Brickster. Great blog you got here, and keep up the problem solving. I myself am a DIYer and also cannot afford to drive 950 miles to the factory and pay their 145$ per hour flat rate unless I have to, which I have had to. The other thing with the factory is: plan on a long wait to get scheduled in, but they do pretty good work, and know their way around these vehicles which were never designed for future servicing, so much as they were designed for manufacture. A lot like modern cars and trucks as it were.
Administrator Reply:
Hi Bart,
Ha – needless to say for us the “factory” is 1000’s of miles away and in a different country! So far our (almost 20 year old) Airstream lives well. The key is keep it maintained and leak free. All the Best ‘The Brickster’ ?
I understand about why the 3/4″ long flexible connection between the tank drain fitting and the tank drain valve failed. What I do not understand is how you replaced it with a 6″ long flexible connection, which should be able to handle that relative movement more easily. That would put the drain valve at or near the frame rail, and beyond the tank enclosure pan. Can you help me understand? Thanks for listening.
Administrator Reply:
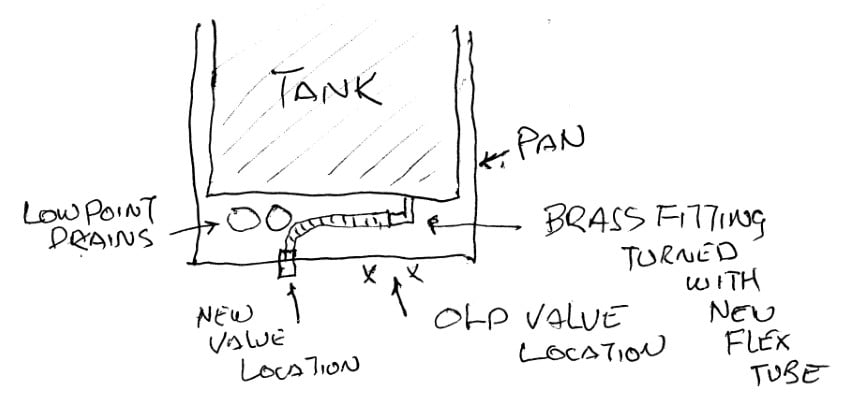
Hi Bart,
Good question! There is a brass fitting from the tank which I turned 90 degrees towards the rear – there is quite a bit of space in the “gap” – basically I move the location of the drain valve about 6″ more between the wheels rather thank behind the forward wheel. I have not encountered any issues in doing this and it has made it a LOT easier to access the valve to empty the tank. Also, as I said this removes the “stress point”. Hope this is clear.