On-Going Winter Maintenance
Winter Maintenance for us is on going. We tend to drive over to the storage facility about every three to four weeks to check thing out. The follow items make up our list of visitation inspection {so to speak 😉).
Empty Dri-Z-Air:
We have stored our trailers in an outside uncovered facility for the past 10 years. The facility is very secure and easy-peasy for backing into our spot as well as relatively inexpensive (about $650 per year). However, there are no services (i.e., water, power or dump station).
Since we have no electrical power we are unable to have a small heater or dehumidifier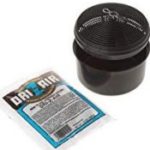 running. While our winters are mild on Vancouver Island (ave. temp. 6-8c) we do have a lot of rain. So to assist in controlling the dampness we use Dri-Z-Air which does a great job. This requires us to visit about every 3-4 weeks to dump the containers as they literally fill with water sucked out of the air! 😬. We experience about a pint of water in each container (2) each visit.
Battery Check:
For years we used to remove our 2 – lead acid batteries and store them in the garage and do all the maintenance stuff for them. Now we have 200w of solar and 2x 100ah lithium with cold weather shut off. Each visit we check the metre to make sure the state of the batteries is as it should be – “Fully Charged“. 😊
Exterior Poke and Prod:
The walk around is very important! We check for tree branches or other things that may have gather against Blue Streak with all the wind we get here during our usual west coast storms.
We check the inside of the exterior compartments including the access doors for the refrigerator and water heater. We are just checking to make sure we haven’t started colonies for wasps and spiders. This year I added screens on the water heater and furnace vents.
In the storage compartments, we check for dampness inside. Moisture inside the storage compartments is a telling you that there’s a rainwater leak somewhere. This must be sourced out ASAP before it becomes a problem.
We also look underneath Blue Streak just to make sure nothing has been blown underneath. The last thing we want is a pile of debris providing a highway for creep crawlers from ground to the underside of Blue Streak. While we look, we are also checking to make sure parts of the belly-pan are nice and tightly fixed. Last year I had a series of 5 or 6 rivets of the belly-pan pop loose and using our Rivet Kit and Rivet Tool we fixed it quickly, so no invitation to creep crawlers was offered.
While we do check the 7-way connector and electrics for the jack, all this is covered with a water proof but breathable cover.
We do check the propane cover and contents to make sure all in well. Tires are still covered and nothing has been tampered with. 😉
Interior Poke and Prod:
The interior begins when we open the door – what do we smell? – NOTHING!!! but a 20 year old Airstream (no mold or funky odours please). We check to make sure the overheads are open and dry. The cupboard and cabinet doors are open and dry for air circulation. fridge/freezer doors are open and the arm&hammer baking soda is do it’s job. Lastly we check the toilet bowl to make sure the Dawn Dish Soap is still nicely coating the seal.
We then leave – double lock the door knowing all is well with Blue Streak….till next time.😎

About The Author
Brickster
Brick and Mona are avid Boondockers, love "Glamping" but still like to experience the down and dirty off grid camping - look for us and say hi. We are easy to spot just look for 25 feet of shiny Air-Aluminium towed by a Dragon Red F-150HD FX4.